
As promised in my last post, here is a tutorial to help you to create your own watercolour nature journal entry.
A lovely reader recently asked what a nature journal is for me. My reply was that it is very easy to become discouraged when looking at journal keeping as ‘art’. If a nature journal is looked at as a means of scientific observation & a way to record that information (rather than trying to create pretty pictures) then it is a much more satisfying experience.
Also as parents, nature journals are a wonderful record of happy times with our children, to bring out often & look back upon.
Here is Rose (now ten years old) working in her journal when she was five years old.


For me personally, as well as the points above, I have learned so much about the world around me from observing nature in my journal. It forces me to slow down and enjoy this beautiful world. I think if everyone kept a nature journal, the world would be a happier and more peaceful place!
So onto the tutorial. I warn you this post has many photos 🙂
I must preface this tutorial by stating that my style will not be for everyone! I used to create my journal entries in the dry brush style that Charlotte Mason favoured. However, it took me such a long time to complete, that I found I was creating less and less pages. This caused me to create pages in my own, much looser style, using a wet on wet technique.
I hope this tutorial will give you the basics to create your own page, to which you can add your own creative stamp.
UPDATE –
I would strongly suggest just ‘playing ‘ with the watercolour first, (especially if you are doing this with children) Experiment to see how much water / pigment works well and play at mixing colours…what happens if red and yellow play, or red and blue? What if red, yellow and blue go to a party?
You will learn much more than you expect, I promise 🙂
I really must do a blog post about colour mixing…
Now that is out of the way, let’s get started!
Materials:
- Nature journal or piece of watercolour paper
- Watercolour paints
- A medium sized watercolour paint brush with a good ‘point’, or a selection of brushes (I just use one)
- A small spritz bottle of water (not essential)
- A glass of water for brush cleaning
- A tissue, or old cloth for wiping your brush
You may also find this old post useful: Supplies For Nature Journaling
I begin by planning out in my head how I want my page to look. Here I have sketched out on the blackboard roughly how I expect this page to work. I like it to include important information, and also to look pleasing to the eye.
Here I have included:
- A title
- A small box in which to show a pictorial representation of the weather at the time of our nature study.
- A sketch of the fungus
- Name & Latin name
- A poem I wanted to include
You will notice that I used this just as a guide, & changed the layout slightly in my finished piece.

Here is a quick shot of my nature study bag, in which I keep my supplies.

I started off by drawing very basic shapes for the three things I wanted to sketch (sorry for the very faint lines!) plus a box at top left for my ‘weather sketch’. You can just make out the vein pattern of a leaf (top left) basic fungus shape (bottom centre) cherry leaf (bottom right).

Here you can see the leaves I am sketching

I worked from this photo for the fungus:

Here is a shot with my trusty carbon pen. Perfect for sketching, as it is permanent ink.

I then added the title, date, weather box, & poem title in ink.

I added a simple outline for my leaf. I added the serrated edges, paying attention to how the leaf edge bent, so I could see less of the little ‘teeth’. I noted the way the veins appeared (opposite one another) & did my best to represent that, looking carefully at how they shaped the leaf.

Here I have marked in the main veins of the maple leaf.

Next I added the outer leaf edge, looking closely at the leaf as I sketched, rather than the paper.

The maple leaf is done, and is far from perfect, but it gives me an adequate visual of a wee nature treasure that I had collected, and simply sketching it caused me to closely regard the leaf in question.


Onto the fungus. It is a case of looking very closely and drawing what you see, not what you expect to see…

I added some written information:


Then added the poem I wanted to include. I thought it would be interesting to add the text over an illustration.

Next I sprayed my watercolour palette with water, which makes the colours lovely & ‘juicy’, and easy to use.

Here are some of my watercolour brushes. I only ever use the one that is out 🙂

Here are my paints, along with a wee colour chart I made that shows what the colours look like on paper. They look very different than in the tin!

On to the painting!
For the cherry leaf shown, I began by splashing on some quin gold. Be sure to have your paints nice & wet.

Into the wet quit gold, I dropped some winsor orange

Then I took Sap green, and dropped some on around the edges. Can you see how the colours run into one another slightly?

Here I am dropping Cadmium red into the still wet orange.

I have taken a mix of orange & red around the edge of the leaf. See how it is nice & ‘splashy’? No painting inside the lines here 🙂

I added touches of red round the edged & into the stalk, and I dropped a tiny spot of green into the stalk, too.

For the Maple leaf, I took some quin gold & splashed it on. See how it pools in some areas? This will make creating light & shade easier later 🙂

I dropped in some cadmium red

Flicked on some sap green (I just tap the end of my paint brush – you could also use a toothbrush to spray on colour)

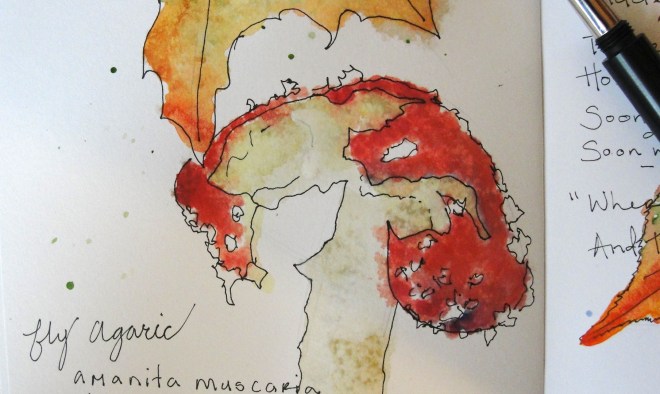
For the fly agaric stalk, I applied a very light mix of quin gold & neutral tint

here I added more where the mushroom was darker


I took Winsor yellow, a lovely warm yellow & just touched it into the wet quin gold/neutral tint wash.

I added cadmium red

some touches of ultra marine to make darker patches

some permanent rose to brighten

A light wash of neutral tint was applied to the wether box to show mist 🙂

Then, as I am want to do, I had fun flicking on splashes of happy colour. This step is optional 🙂

I added a few wee touches of white gouache on the stalk of the fly agaric as a highlight.

All done!


Please feel free to ask any questions, and do share your own journal entries. I am far from an expert, but I have found a way to create entries that works for me & I very much enjoy our nature study time.
I am looking into the possibility of running a live class online, to help you create your own watercolour journal entry, were we paint along together. Would this be of interest at all? Please let me know in the comments if this is something you think you may want to do.
Happy exploring!


